


Photo by Nicholas Cappello on Unsplash
Display Data on the Frontend Using The Graph of the Contract Deployed on Rootstock


What is Rootstock?
Rootstock (RSK) is a groundbreaking platform that serves as the first and most enduring Bitcoin sidechain. It is designed to combine the robust security of Bitcoin’s proof-of-work (PoW) consensus mechanism with the flexibility and programmability of Ethereum’s smart contract capabilities. This unique integration bridges two of the most powerful blockchain ecosystems, offering the best of both worlds.
Rootstock operates as a Layer 2 solution for Bitcoin, meaning it extends the functionality of the Bitcoin blockchain without compromising its foundational security. By leveraging Bitcoin’s hashing power, Rootstock ensures a high degree of decentralization and resilience, with more than 60% of Bitcoin miners currently participating in its network through merged mining. This level of adoption makes Rootstock one of the most secure smart contract platforms in existence.
The platform is fully open-source and compatible with the Ethereum Virtual Machine (EVM), enabling developers to deploy Ethereum-based decentralized applications (dApps) directly on Rootstock with minimal adjustments. This compatibility supports a wide range of use cases, including decentralized finance (DeFi), non-fungible tokens (NFTs), supply chain tracking, and beyond.
Rootstock’s evolving ecosystem is designed to become entirely trustless, removing the need for intermediaries and custodians. This ensures that users retain complete control over their digital assets, aligning with the core principles of blockchain technology. As a gateway to innovative and secure dApps, Rootstock is not only expanding Bitcoin’s utility but also pushing the boundaries of what blockchain technology can achieve.
What is The Graph?
The Graph is a decentralized protocol that helps index and query data from the blockchain. With the help of The Graph, it is possible to query data that is often difficult for users to access directly. Any Ethereum data can be searched through simple queries using The Graph Protocol.
Why was The Graph Protocol important in the first place? DeFi and NFT services like Uniswap and Bored Ape Yacht Club store data on the Ethereum Blockchain which is difficult to read or query. Bored Ape Yacht Club has information such as products and other important information available. This is because they are programmed into smart contracts after all. But smart contracts are not enough for advanced queries like aggregation and search, and filtering between specific holding addresses. To access this data we need to process every issue ever released and read metadata from IPFS (Inter Planetary File System) using Token ID and IPFS hash. Moreover, the whole process takes hours or even days to finally get the data we need.
The Graph Protocol solves this problem by decentralizing the query and API (SubGraphs) layer, we don’t have to dig so deeply into the information we need.
What is a Subgraph?
A subgraph is a custom API constructed on blockchain data. Subgraphs are queried with the use of the GraphQL language and are deployed to a Graph Node using the Graph CLI. Once deployed and published to The Graph decentralized network, Indexers method subgraphs and cause them to be available to be queried by using subgraph consumers.
Building a Subgraph
Subgraphs can be built by following these steps:
Creating a subgraph on Subgraph Studio.
Installing The Graph Protocol CLI.
Initializing the subgraph.
Deploying the subgraph.
Create, Deploy, and Custom Subgraph
To create the Subgraph go to the Link
Enter the Name for the Subgraph and it should be Unique to a particular account.
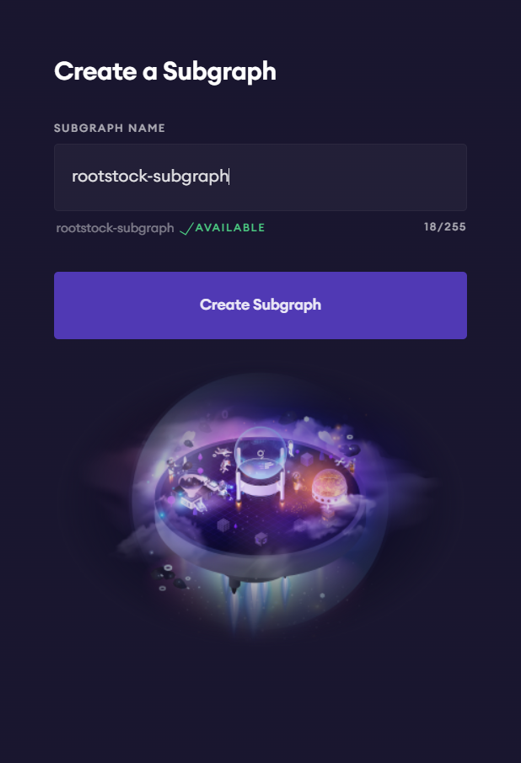
Once we create the Subgraph then all the commands that will be seen on the page should be entered in the console of the directory (create a new directory).
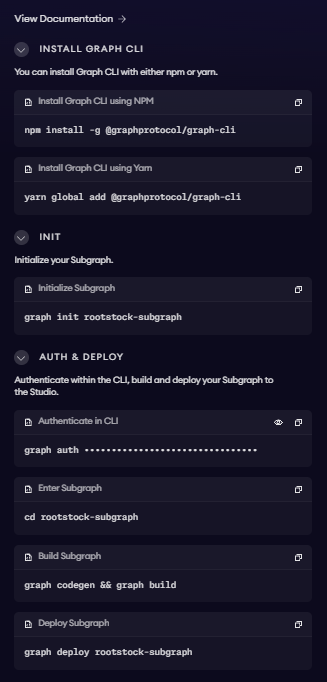
Follow the steps below in the following order
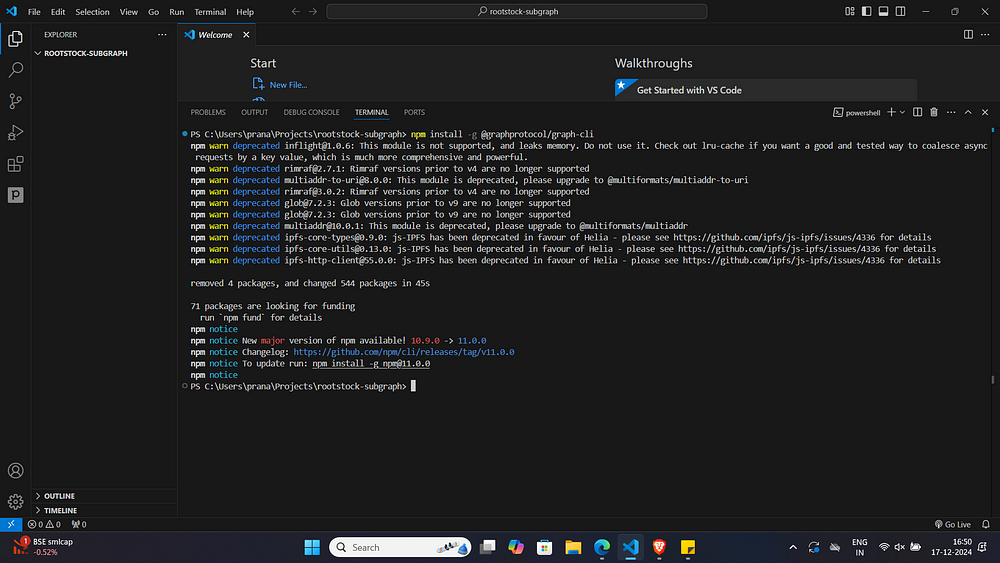
Step 1: Install the Graph CLI
First, install the Graph CLI by running one of the following commands in your terminal:
npm install -g @graphprotocol/graph-cli
Or via
yarn global add @graphprotocol/graph-cli
Step 2: With your terminal pointing to the directory that we just created, run the following command:
graph init --studio <SUBGRAPH_SLUG>
Step 3: You will get several options to select a protocol, locate ethereum and hit enter.
Step 4: Enter a slug name for the subgraph.
Step 5: Name the directory in which the subgraph will be initialized.
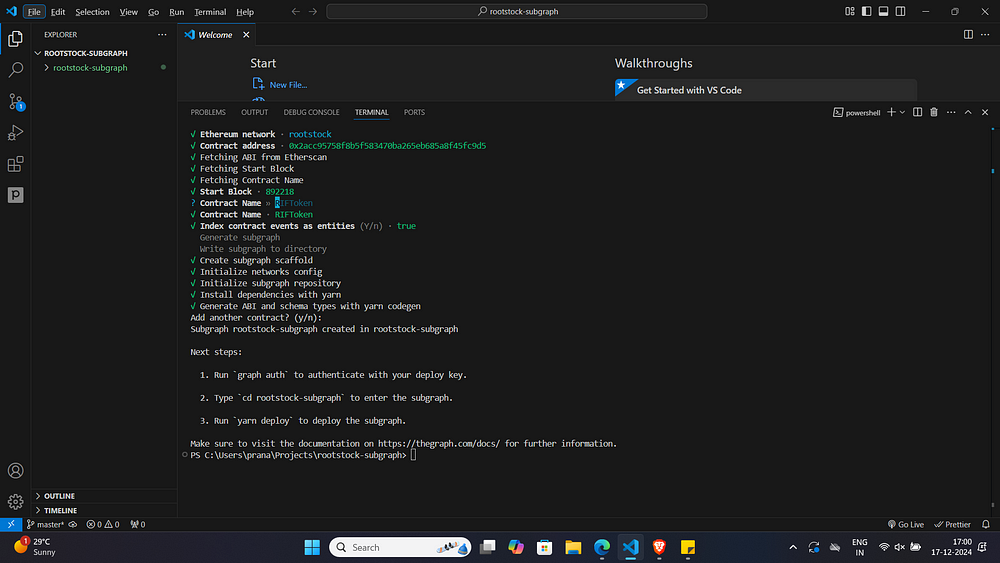
Step 6: Select Rootstock as the Network.
Step 7: Enter the contract address for your contract, you can enter your custom contract address too (The contract that you deploy)
Here we will be taking the RIF contract address
All our details will be fetched automatically, if it fails then the alternate way to get it is using the ABI.
Step 8: The start block will be fetched automatically.
Step 9: Give the contract name.
Step 10: Set Index contract events as entities to y.
Wait while the subgraph gets generated.
Lastly, press n to Add another contract? (y/n). (If you want to add any other contract press y and enter the contract address for the same)
Lastly, our console will look like this
Authenticate your Subgraph
Go to Subgraph Studio, there right next to the Subgraph Slug, you will find your Deploy Key. Copy the deploy key and in your terminal, run the following command.
graph auth --studio <DEPLOY KEY>
For Windows:
Run the command
graph codegen
Followed by:
graph build
For MacOS and Linux.
graph codegen && graph build
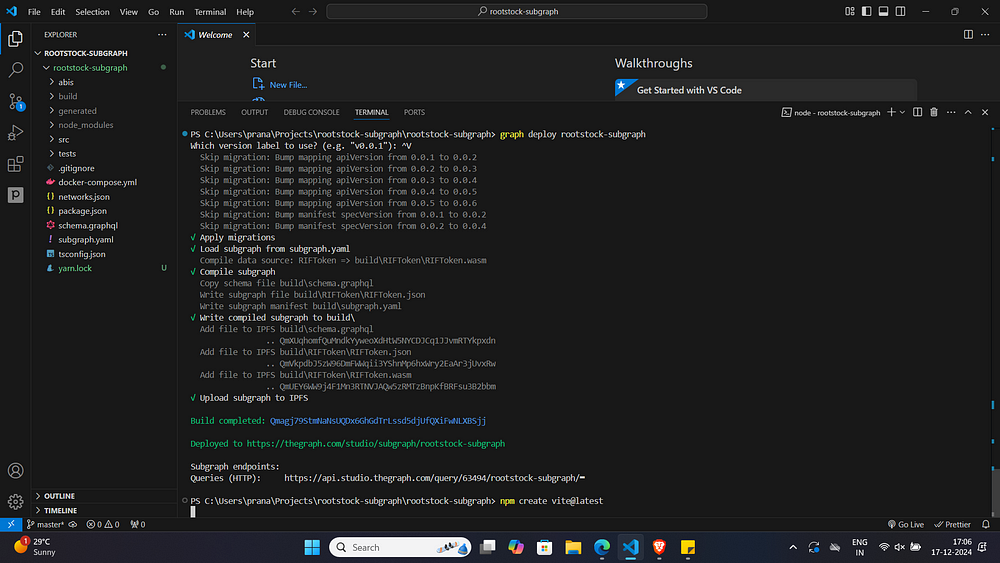
Deploy the subgraph
To deploy your subgraph, run the following command:
graph deploy --studio <SUBGRAPH SLUG>
Enter v0.0.1 as the version of your subgraph.
After this, your subgraph should be deployed on the Subgraph Studio.
Your command line will look something like this:
Define the Subgraph Schema
The schema.graphql is like the blueprint of a building. It defines the data structure that The Graph will index and make queryable. It uses the GraphQL schema definition language (SDL), a human-readable syntax for describing the shape of your data. In our case, it describes the types of data that the Subgraph will process from the blockchain and how they will relate to each other.
Define the Data Sources
The subgraph.yaml file is like the project manager coordinating between the blueprint and the construction crew. It ties together the schema.graphql and the src/mappings by specifying which blockchain events should trigger which handler functions.
In this file, you define the smart contracts you want to track on the blockchain, the events in those contracts that you’re interested in, and the handler functions that should be called when those events are emitted. You also specify the starting block for the Subgraph, which is the block from which it should start processing data. In essence, subgraph.yaml serves as a configuration file that guides The Graph node about what data it should be looking for, where to find that data, and how to process it.
Querying Data in Playground
Go to your Subgraph Studio and click on the subgraph that we just created.
There you can now see the Status as Deployed.
To query our data from the blockchain, let us head over to Subgraph Studio Playground.
Also to play with data you can directly paste the Query URL into the Browser

Fetch Data on Front-end
Follow the steps given below:
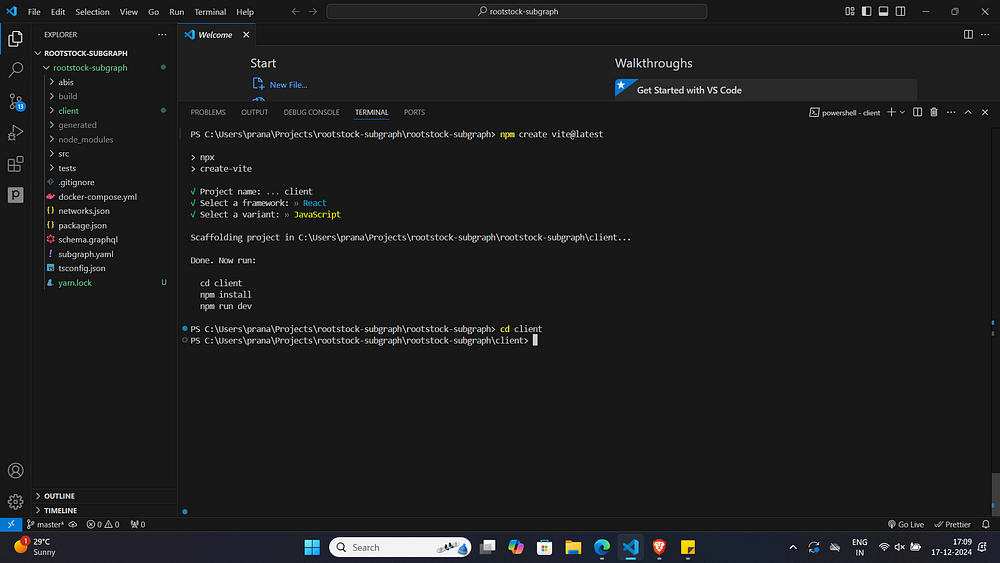
- To create a React app run the following command:
npm create vite@latest
2. To start a project, Enter the project name as client, choose React as the framework, and then JavaScript (without SWC) and execute the necessary commands.
cd client
npm install
npm run dev
3. Installation of graphql, a highly configurable and flexible GraphQL client for React, and urql, a data querying tool, are required.
npm install graphql urql@3.0.3
4. Navigate to src/App.jsx inside the directory, and replace the old code with
import { useState, useEffect } from 'react';
import './App.css';

function App() {
  return (
    <>
      <div>

      </div>
    </>
  )
}
export default App;
5. Here, we will utilize the subgraph we just created.
const const QueryURL= "https://api.studio.thegraph.com/query/[user-id]/rootstock-subgraph/version/latest";
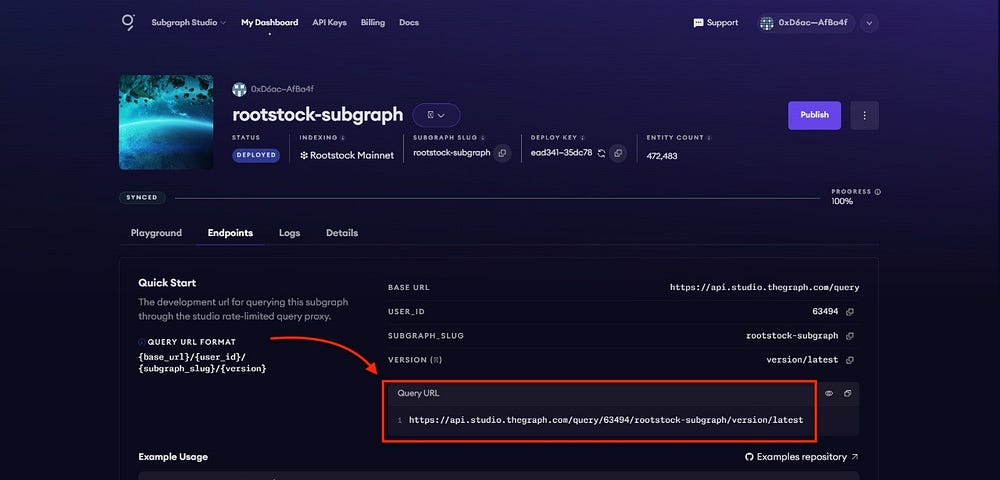
6. To access the subgraph, click the endpoints button on the right and copy the Query URL.
7. Go back to our App.jsx and store the URL in a variable inside the App function.
8. The data you wish to query should be added below the QueryURLvariable.
const query = `{
    transfers(first: 5) {
      id
      from
      to
      value
    }
}`;
9. To use Subgraph, create a client. We are going to use urql for this. Include the import statement that follows at the top.
import { createClient } from 'urql';
10. After the query variable, insert the following code to construct the client.
const client = createClient({
  url: QueryURL
})
11. To track the state, we will utilize useEffect and useState. In the App function, add the following code.
const [transfers, setTransfers] = useState([]);
useEffect(() => {
    const getTransfersAndOwnership = async () => {
      const { data } = await client.query(query).toPromise();
      setTransfers(data.transfers);
    };
    getTransfersAndOwnership();
  }, []);
12. We will return the following to show the data on the front end.
Here we will be just displaying the Transfer ID, From, To and Value on the Frontend
return (
    <>
      <div>
        <h1>Transfers Information</h1>
        {transfers.length > 0 && transfers.map((transfer) => {
          return (
            <div key={transfer.id}>
              <div><strong>Transfer ID:</strong> {transfer.id}</div>
              <div><strong>From:</strong> {transfer.from}</div>
              <div><strong>To:</strong> {transfer.to}</div>
              <div><strong>Value:</strong> {transfer.value}</div>
            </div>
          );
        })}
      </div>
    </>
  );
13. Your final App.jsx should look like this:
import { useEffect, useState } from 'react';
import { createClient } from 'urql';
import './App.css';

function App() {
  const [transfers, setTransfers] = useState([]);

  const QueryURL = "https://api.studio.thegraph.com/query/[user-id]/rootstock-subgraph/version/latest";

  const client = createClient({
    url: QueryURL
  });

  const query = `{
    transfers(first: 5) {
      id
      from
      to
      value
    }
}`;

  useEffect(() => {
    const getTransfersAndOwnership = async () => {
      const { data } = await client.query(query).toPromise();
      setTransfers(data.transfers);
    };
    getTransfersAndOwnership();
  }, []);

  return (
    <>
      <div>
        <h1>Transfers Information</h1>
        {transfers.length > 0 && transfers.map((transfer) => {
          return (
            <div key={transfer.id}>
              <div><strong>Transfer ID:</strong> {transfer.id}</div>
              <div><strong>From:</strong> {transfer.from}</div>
              <div><strong>To:</strong> {transfer.to}</div>
              <div><strong>Value:</strong> {transfer.value}</div>
            </div>
          );
        })}
      </div>
    </>
  );
}

export default App;
14. Run npm run dev to view the frontend.
15. The final Frontend will look like this, with details on it
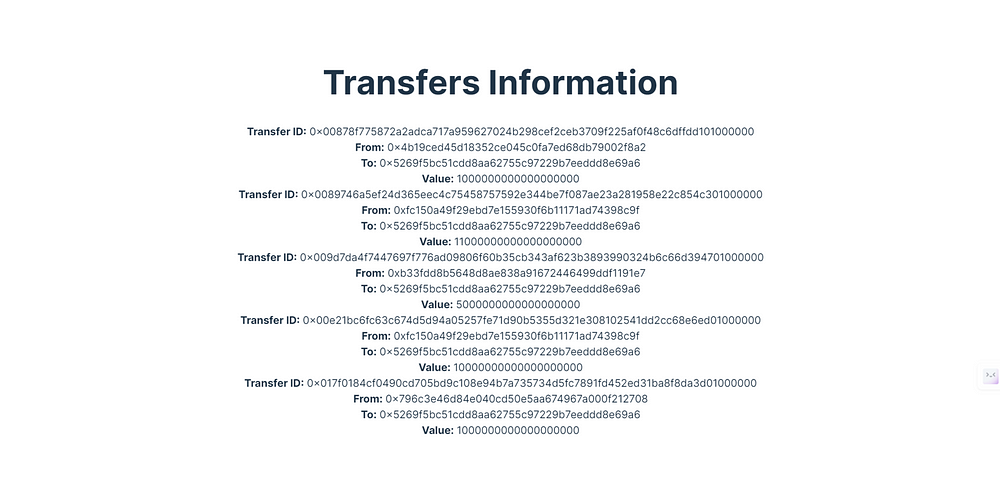
Wohooo! You did it. 🥳 Congratulationsss!
Make use of The Graph Playground in the dashboard to use different queries and display that data.
If facing any errors, join The Graph or Rootstock discord and ask under the respective channel.